A Mural Experiment: Exploring Custom Imprints™
Are you a believer in the phrase, “Fake it till you make it?” As an Artist, Artisan, Faux Finisher, Decorative Painter, Regular ol’ Painter—whatever title you want to call me, the last thing I would ever consider would be a “Muralist.”
I have a deep appreciation to those of you who paint murals as a consistent form of your art. I APPLAUD YOU.
Why? Because what you do takes a special kind of talent and patience that I just don’t categorize myself with. I’m good at other things. But I used to turn down jobs for murals. Mostly, because I don’t have the formal training, but I really think it’s because I’m generally an impatient person. The time and attention it takes to install a mural is just not in me. Or at least, that’s the voice in the my head. I don’t mind sharing with you my flaws because what I am good at is always being up for a challenge and trying new things. And taking on a mural was my chance to step out of the boat.
Up for the Challenge
I really wanted to prove to myself that I could in fact install a mural and that the client would actually be happy with it. So, for those of you who relate to the whole impatient part with me—as well as the challenge, I think you’ll really enjoy this project.
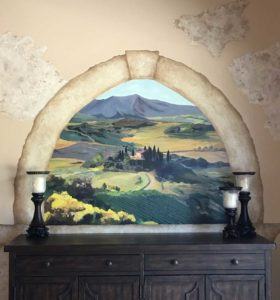
Mural Inspired by Italy
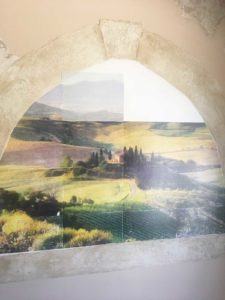
The mural idea that the client had was pretty straightforward. A Tuscan/Italian country hillside with vineyards, natural landscaping, etc. Whenever I’m up against a new project, the first thing I do is explore the arsenal I have with Faux Effects products. So, I immediately thought, hey! I could use a Custom Imprint™! If you have never heard of Custom Imprints™, they are essentially like a temporary tattoo for walls or furniture, but really it’s a permanent transfer of any image (non-copyrighted) onto the surface of your choice. This is also a great alternative to other decorative elements for furniture such as stencils or modellos. You can create the illusion of hand-painting without all the work.
The reason I knew the option of Custom Imprints™ could work for my project was that it wasn’t a big space. I was only working with a section around 4’ x 4’ on one wall so this was manageable. The first thing I did was find some stock photos of the flavor of what the client wanted. Once they made their selection, I got real fancy and used an app on my phone, Brushstroke, which changes photos to look like various painting styles. (As a side note, I don’t know that I would use the app next time. I think I could have worked better with the resolution of the original photo once the image is sized up so much….live and learn)
Work Smarter, Not Harder
I ordered the Custom Imprint™ from Faux Effects based on that image. It’s not a cheap alternative, however—when I consider the time (days) it would have taken me to draw out the perspective of the image, I would still be there working there drawing. And erasing. And re-drawing. I decided to work smarter, not harder.
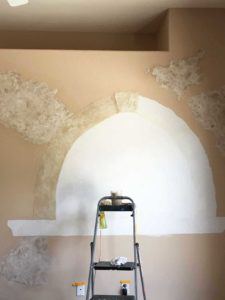
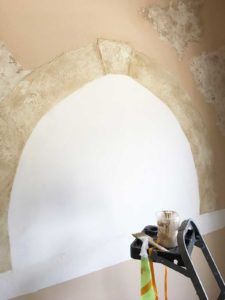
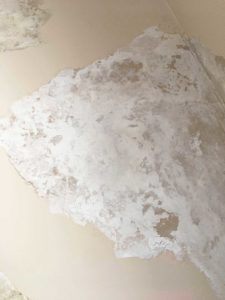
I added some plaster around where the main image would be to fill in the empty spaces of the wall, as well as backfill the orange peel texture. I wanted the surface as smooth as possible. For the center of the mural, I used O’Villa Finishing Plaster™ in clear, two coats, then skimmed Venetian Gem® White on White for a super white base. It was easier for me to trowel a quick coat, then roll on white SetCoat®, plus, I feel I get a smoother finish with troweling. Light sanded. For the surrounding stone look, I used RsStone™ fine and activated it with the RsActivator™. RsStone™ fine is one of my favorite products. It gives one of the most authentic stone effects out of any of the plasters. Then I just glazed it to age it up a bit. I used FauxCrème Colors™ and the TransOxides™, too.


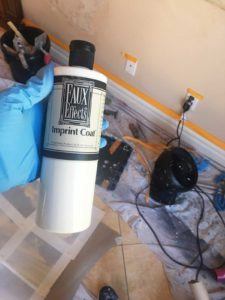
Before I could get the Custom Imprint™ up, I had to apply Imprint Coat™. This can be rolled or brushed on. I rolled on 3 coats with a foam roller and let each dry in between. 3 coats was probably overkill—2 would have been fine I’m sure, but with new challenges, I like to minimize any chance for error (if at all possible).
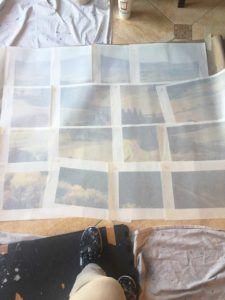
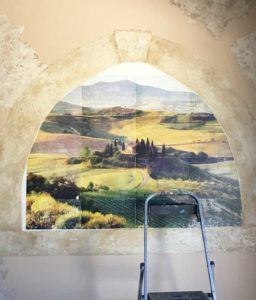
While that was drying, I laid out the sheets of the image. I put them in order, then cut away the excess blank paper around each sheet image. Once that was done, it was the moment of truth….

Will this even freaking work?!?!
Of course it will! I think, 😉
I really wasn’t worried. I knew I’d make it work somehow, some way. More curious than anything that I really could have stumbled onto something so cool. But maybe I’m not the only one who thought of this? Anyone out there done this before?
I started in the corner. The first one I applied, I don’t think I used enough pressure to adhere the image to the surface. It was definitely a 6/10. Oh well, keep going!
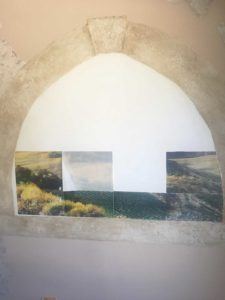
Now it’s all up. Not perfect, but I’m gonna paint over it anyway.
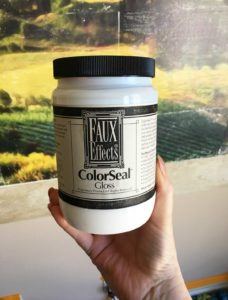
Then I sealed the image with ColorSeal™ as a barrier coat to protect the image. I use gloss for my isolation layers to maintain the clarity of the color. The more layers you add of a duller sheen like satin or dull, especially over darker colors, the ‘frost’ of the flattening agents can build up and distort the clarity. Since I’ll be doing a final topcoat in C-500™ Dull it won’t matter if this step is super glossy.
Now it’s time to paint! And paint! And paint!
I knew I wasn’t going to paint the image ‘exactly’, just use it as a template to add my signature and my own style. You could say this is a lot like painting by numbers, but don’t let this fool you into thinking it doesn’t require any skill. You need a strong foundation in Color Theory to be able to mix and match colors accordingly. If you have never taken a Color Theory Workshop—especially here at Faux Masters, then you need to come visit me and we’ll have a paint party. This is something every artist or painter needs to know. #forrealtho
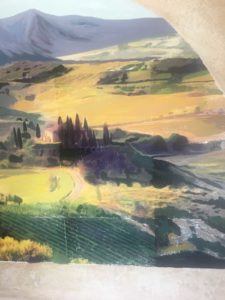
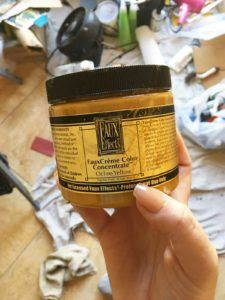
I used a variety of paints, such as FauxCrème Colors™ and even the concentrates. The Concentrates have 3 times the amount of pigment in the regular FauxCrème Colors™ so I’m able to mix richer colors with more opacity.
Getting there….
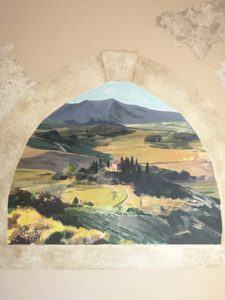
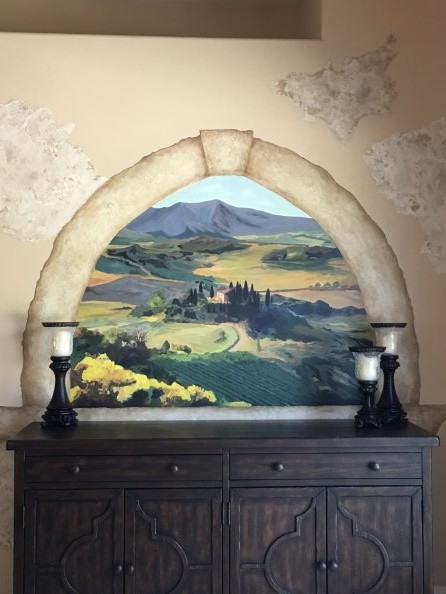
And Finally Complete!
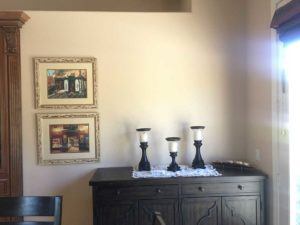
I love it! The client loves it and now I think I can say I’m a muralist. Just kidding…but I’m still super proud of it. I hope I’m able to encourage someone out there to try something new!
So, where are all my REAL muralists at?! Would you ever try this? Comment below and let me know what you think of this project!
2 Comments
Great concept,well done! I like the idea you can paint on top of the imprint, making it more authentic with brushstrokes. I’m interested in knowing if one could just get imprints of intricate buildings and then the artist can fill in the rest of the landscape. I finished a marital with a couple of intricate buildings and I surely could’ve used an imprint it would’ve save me quite a bit of time. Check out my Switzerland Mural
on my website, and let me know if I could’ve just purchased an imprint of the castle, and painted on top ?
*Finished a mural